
- Joined
- Aug 31, 2010
- Messages
- 3,888
- Motherboard
- Asrock Z87E-ITX
- CPU
- i7-4770S
- Graphics
- GTX 760
- Mac
- Mobile Phone
New 10.10.4 Version of this guide available here 
Introduction
First of all, welcome to the new Yosemite install guide for the Intel Haswell NUC !
This guide follows on from the previous Mavericks version (here) and has now been updated for Yosemite 10.10.2. This version of the guide has been delayed since my NUC decided to die on me just before xmas, it has taken until now to get the replacement unit. This does not mean they are unstable or unfit for purpose; I was simply unlucky that it crapped out on me at that time.
As part of this update, I have worked on the latest bios version and software versions, all of which are detailed in the guide.
The current hardware reads like this :
As before, the guide is only verified to work with the versions stated; that is version 0035 for the bios and 10.10.2 OSX. Previous bios versions and previous versions of OSX have worked well together, but I do not have the time to test and verify every OSX version with every bios version ever released.
As previously, I recommend you do your homework; read this guide from start to finish before commencing the install, and pay particular attention to Section 1 of the guide. We will be using the standard TonyMacX86 tools to achieve this (Chimera/Multibeast/Unibeast). There is an alternative install method using Clover, which is detailed here and Minihacks build here; you are free to choose either method of course, but please do not attempt to mix and match these methods; it just wont work.
On with the guide then !
Guide Layout
The guide is broken down into 8 simple sections; you are recommended to read and complete them all in the order stated. They are :
1. Pre-Install Notes
2. Hardware Covered By The Guide
3. What Works And What Doesn’t Work
4. Download The Software
5. Setup The Bios
6. Create The Unibeast Installer
7. Install OSX
8. Configure Multibeast
9. Audio Setup And Configuration
10. Customizing The System
Section 1 - Pre-Install Notes
!!! IMPORTANT !!!
Take your time and pay attention to the guide; follow it to the letter. Copy the files to the exact locations specified. Run the programs from the locations specified. This is important to help ensure a successful install.
Creating The Unibeast Installer
Newer versions of Unibeast, including the one we use here, do not by default allow you to use an external USB drive. Installing from an external USB drive provides a smoother and faster experience overall. If you wish to use an external USB drive, then you should first erase and then partition it using the Disk Utility tool in OSX. Create a single partition of 8 Gb in size at the start of the drive, then create a second blank partition that uses all remaining space. This should allow to you use the drive in Unibeast, making sure you use that first partition to install to.
Ram Memory
If you only have a single stick of ram memory in your NUC, then do yourself a big favour; go to your favourite hardware site and get yourself a second stick of ram that is exactly the same as your existing one, or, treat yourself and order a brand new ram kit with 2 x sticks in it. Really.
The NUC is designed to operate in dual channel mode, which means for optimum operation, you really do need 2 x ram sticks. Just about every mac ever made uses dual channel memory. And just about every version of OSX ever produced assumes the machine will be running in dual channel mode too.
If you insist on using a single stick of ram memory, this guide *might* work if you are very lucky, but chances are it will fail at some point. I will be unable to help you get your system installed if you only have one memory stick.
Also, consider the fact that the HD5000 uses system memory for the graphics display, you shouldn't skimp when it comes to ram memory. 16Gb is ideal, 8Gb is ok. I would not recommend running the NUC long term with just 4Gb, as this wont leave a lot of memory for OSX.
The link at the top of this guide will take you to the memory I recommend. This has worked flawlessly for me every time, and is of excellent quality!
Rebooting The NUC During The Install
At several stages throughout this guide you will need to reboot your NUC. My advice when this is required, is to shut down the NUC, remove the power connector for 20 seconds, then plug it back in and start it up again. This means it will take a fraction longer to complete the install, but I have found from experience that this really helps to minimise the installer crashes that can happen.
Installing To An SSD Drive
If you are installing OSX to an SSD drive in your NUC, I recommend starting with a blank unformatted drive. Most manufacturers provide tools that will allow you to flash erase the SSD and reset it back to almost factory condition.
Old school disk formatting tools that write 0/1 to every block on the drive are not recommended; they do erase the drive but do it in a very unfriendly way. My personal choice for flash erasing my SSD's is a tool called PartedMagic.
Section 2 - Hardware Covered By The Guide
There are several variations of the Core i5 model NUC; they are all supported by this guide :
Intel Haswell NUC D54250WYB : Motherboard Only Package
Intel Haswell NUC D54250WYK : Motherboard In Standard Chassis
Intel Haswell NUC D54250WYKH : Motherboard In Enhanced Chassis, Space For 2.5” SSD
Note : The motherboard in each of the 3 packages contains the same hardware.
Section 3 - What Works And What Doesn't Work
Built-In Hardware :
Working : Audio (Realtek ALC283)
Working : Ethernet (Intel I218-V)
Working : Graphics (Intel HD5000)
Working : USB3 (Intel)
Optional Hardware :
Working : Apple Cinema Display 27" (DP Version)
Working : Broadcom BCM4322 (Airport Extreme)
Working : Dell U2311H (1920x1080 Ultrasharp Monitor)
Working : Dell U2413 (1920x1200 Ultrasharp Monitor)
Working : G.Skill Ripjaws Ram Memory (F3-1600C9D-16GSRL)
Working : Intel SSDMCEAC240B3 mSata SSD (240 Gb)
Working : Samsung EVO 840 mSata SSD (1 Tb)
Additional Functionality :
Working : Audio Over DisplayPort
Working : Audio Over HDMI
Working : GPU Power Management
Working : Power Management (P-States upto 2.6Ghz)
Working : Sleep & Shutdown
Note : The built-in microphone doesn't work.
Note : Other wireless LAN/bluetooth cards may work but have not been tested at this time.
Note : CIR (Consumer Infra-Red) on the NUC is NOT working at this time.
Note : P-states have been tested and showed the following : 8, 13, 14, 16, 17, 18, 19, 22, 23, 26
Summary : The working state of the hardware looks good with the minor exceptions of the CIR device and built-in microphone, which are not likely to ever have support.
Section 4 - Download The Software
Follow the links below to download the programs and patches we will use for the install. Download them all before you begin :
Note : Download size for all the tools (Except OSX 10.10.2) is around 80 megabytes.
Note : Azul Framebufer Patch filename : [graphics_intel_hd5k-azul-f-90_patch.command.zip]
Note : SSDT-1 filename : [NUC-HD4600-A1.zip]
Note : Some site registrations may be required.
Note : Other software versions *may* work but are not supported by this guide.
Summary : Download the specified versions of the software we use, using the links provided.
Section 5 - Setup The Bios
The bios version string should be WYLPT10H.86A.0035.2015.0126.1814, which is version 0035 on the Intel download site.
Below is an example of how it looks in the bios itself :

Follow the bios screenshots included in the NUC Install Pack to set your bios settings correctly. Pay particular attention to the following :
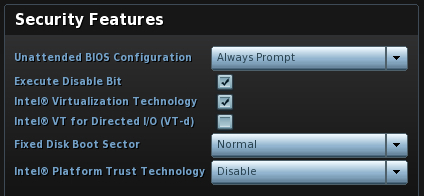
a. Security > Intel(R) VT for Directed I/O (VT-d).
It is recommended to de-select this for OSX to work correctly. There is a workaround where you can have it enabled, but VT-d has no real use in OSX anyway :
b. Boot > Boot Priority.
At this time, you should enable both 'UEFI Boot' and 'Legacy Boot' :
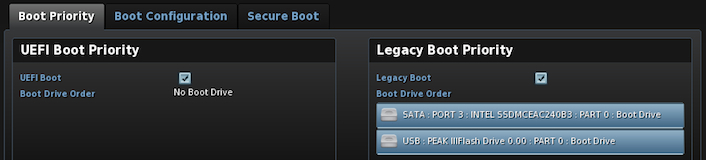
The observant ones of you will notice above that I have the Intel mSata SSD installed; this is what I use for testing and installation checks, before switching to the Samsung 840 SSD.
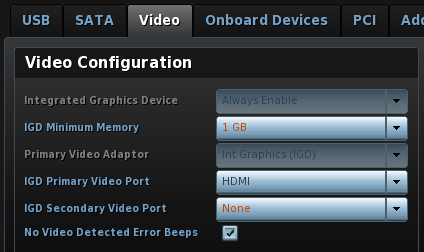
c. Devices > Video.
Set the ‘IGD Primary Video Port’ according to the type of display connection you are using. I have set the secondary port to 'None' and the 'IGD Minimum Memory' to 1Gb. This memory setting does not appear to have any effect on the actual amount of memory used by OSX :
Note : The NUC Install Pack includes screenshots of the exact bios settings I have used; you should use these too. All of these have been updated from version 0035 of the bios.
Summary : Make sure you setup the bios correctly before you begin, otherwise it might not work.
Section 6 - Create The Unibeast Installer
To create the Unibeast Installer we will use the official Unibeast guide and then customize it to work with the NUC. You will need a blank USB memory key for this; it should be at least 8Gb capacity. Some USB hard drives may also be used for this; see the notes in Section 1 for details.
First, head over to the official Unibeast creation guide which can be found here. Follow Steps 1 & 2 of that guide to download OSX Yosemite (If you haven't done so already), and then create your Unibeast Installer.
Be sure to label the chosen memory key as 'USB', as directed in that guide.
Once those 2 steps are complete, we then need to customize the installer to make it work with our NUC.
Start by opening the 'Terminal' app and at the prompt, type in the following and press Enter :
You will be prompted for your password; go ahead and type in your password then press Enter.
Next, type in the following at the prompt and press Enter:
This has made all of the files and folders visible on the Unibeast installer, which were hidden when it was created. You can now exit the 'Terminal' app.
Next, unzip the NUC Install Pack; we are interested in 3 files which are :
File : 'kernel'
From : The NUC Install Pack
To : '/System/Library/Kernels/' (On the Unibeast Installer)
File : 'smbios.plist'
From : The NUC Install Pack
To : '/Extra' (On the Unibeast Installer)
File : 'org.chameleon.boot.plist'
From : The NUC Install Pack
To : '/Extra' (On the Unibeast Installer)
Next, go to the '/Extra/modules' folder on the Unibeast Installer and delete the file called 'HDAEnabler.dylib'.
At the root of your Unibeast Installer drive, create a folder called 'Software', and copy all the software you downloaded into this folder, including the NUC Install Pack. Do not copy the OSX Installer app itself, just the other software. This will save you having to swap drives around later.
Summary : We have created a standard Unibeast Installer, with customized kernel and configuration files, as well as the necessary software we will need during installation.
Section 7 - Install OSX
We are now ready to commence the installation of OSX to the NUC. Insert your Unibeast Installer drive to a free USB port on the NUC and reboot it. When it boots, press F10 to get to the boot menu and select the Unibeast Installer drive to boot from.
Now you will see the Chimera boot screen with the 'USB' icon in the middle. Hit the space bar, type in the following boot flags and then press Enter:
The configuration file on the Unibeast Installer is preset for 1080p screen resolution. If you use a monitor that has a resolution of anything other than this (1920 x 1080), you may need to add this additional boot flag :
The example above is for a 1440p screen, such as the 27 inch Apple Cinema Display, which has a resolution of 2560 x 1440 pixels. Adding this boot flag will override the default one on the Unibeast Installer, but make sure you use the quotes as shown above.
The reason for this is because sometimes the graphic display on the installer screen can otherwise appear corrupted and unusable. You should add this additional boot flag throughout the installation steps; once your NUC is booting on its own, you can add the correct resolution settings permanently to your 'org.chameleon.boot.plist' file.
After a minute or so of loading files, you will see the usual OSX installer screen.
First thing to do is load the 'Disk Utility' app from the menu at the top of the screen, and partition your drive accordingly. I used the entire capacity of the drive and labelled it 'Yosemite'. The rest of the guide assumes you have used the same label; you are free to rename it after the installation is complete. When creating the partition, be sure to click on the 'Options' button and set the partition scheme to 'GUID Partition Table'. This should be the default option but always best to check.
When you are done partitioning, start the installation and let the OSX Installer do its magic.
At the end of the install when prompted you should reboot your NUC, but leave the Unibeast Installer connected. Once again, when the NUC boots, press F10 to get to the boot menu and select the Unibeast Installer drive to boot from.
This time you will see the Chimera boot screen with a 'USB' icon and also a 'Yosemite' icon.
Highlight the 'USB' icon, hit the space bar and type in the same boot flags followed by the Enter key :
Remember to add your custom Graphics Mode flag if needed.
This will start the OSX Installer a second time; when you reach the installer screen, start the 'Terminal' app from the 'Utilities' menu at the top. You should see the bash prompt like this :
Copy the modified kernel file FROM the Unibeast Installer TO the NUC system drive (Yosemite). To do that type in the following and press Enter :
Now exit the 'Terminal' app.
Summary : We now have OSX fully installed to the NUC system drive (Yosemite) and the modified kernel in place that will allow it to boot correctly.
Section 8 - Configure Multibeast
The time has now come to setup Multibeast on your NUC. Quit the OSX Installer and reboot your NUC but leave the Unibeast Installer plugged in. Press F10 to get the boot selection screen and select the Unibeast Installer drive to boot from.
This time at the Chimera boot screen, highlight the 'Yosemite' icon. Hit the space bar and use the same boot flags as before, or the ones you wrote down :
After a minute or so of scrolling files up the screen, the NUC should now boot into the OSX installation. You will be presented with the usual configuration steps where you complete the network selection, license agreement and create a new User Account. Complete these steps as normal and you will reach the OSX desktop screen.
Before we go any further, copy all of the software FROM the 'Software' folder you created on the Unibeast Installer drive TO the Downloads folder of your NUC. Unzip the NUC Install Pack in the Downloads folder.
Now, from the Downloads folder of your NUC, unzip and start Multibeast and load the NUC.mb configuration file from the NUC Install Pack. This will pre-select all the files and options we are interested in, and should look like this :
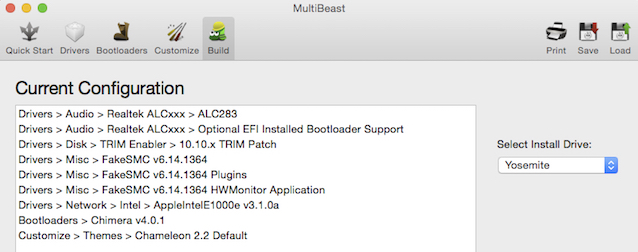
The '10.10.x TRIM Patch' is optional but recommended if you are installing to an SSD drive, unless of course you have your own trim method, such as the Cindori TrimEnabler.
The theme can be changed to whichever one you prefer.
Whatever you do though, please do NOT select the QuickStart option in Multibeast or change any other settings, as this will cause issues. The default selection in the 'NUC.mb' configuration file as shown above should be suitable for most users.
Make sure you select your NUC system drive (Yosemite) as the install target before proceeding.
Close Multibeast when it has finished installing.
On the NUC system drive (Yosemite), go to the '/Extra/modules' folder. Delete the file called 'HDAEnabler.dylib'.
Next, we need to copy those 3 files to the NUC system drive (Yosemite) :
File : 'SSDT.aml'
From : The NUC Install Pack
To : '/Extra' (On the Yosemite System Drive)
File : 'smbios.plist'
From : The NUC Install Pack
To : '/Extra' (On the Yosemite System Drive)
File : 'org.chameleon.boot.plist'
From : The NUC Install Pack
To : '/Extra' (On the Yosemite System Drive)
You can now eject the Unibeast Installer and reboot the NUC.
When you reboot it, type in the following flags at the boot screen (This only needs to be done once) and press the Enter key :
Your NUC should now boot on its own.
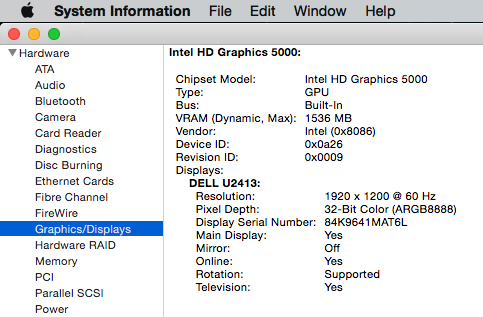
Do a quick check to make sure the graphics are working as expected; go to About This Mac > More Info > System Report then select the 'Graphics/Displays' section. If all is well it should look similar to this :
Now close System Information.
Summary : We now have a basic configuration installed and made the NUC bootable.
Section 9 - Audio Setup And Configuration
As part of the Multibeast installation, we have already installed the kext file that is needed for the ALC283 internal audio, but there are a couple more steps to complete which will also enable audio over HDMI/Displayport, and complete our configuration.
Unzip the file called 'NUC-HD4600-A1.zip' in your Downloads folder. In the resulting folder you will find a file called 'SSDT-1.aml'; you should copy this to the /Extra folder of your NUC system drive (Yosemite).
Next we will apply the Azul Framebuffer patch. This is located in your Downloads folder and is called :
'graphics_intel_hd5k-azul-f-90_patch.command.zip'
Double click the file to unzip it, and then double click the unpacked file to apply the actual patch. This patch will run in a Terminal window and you will be asked for your password before proceeding. Once the patch has applied, check the output for any error messages.
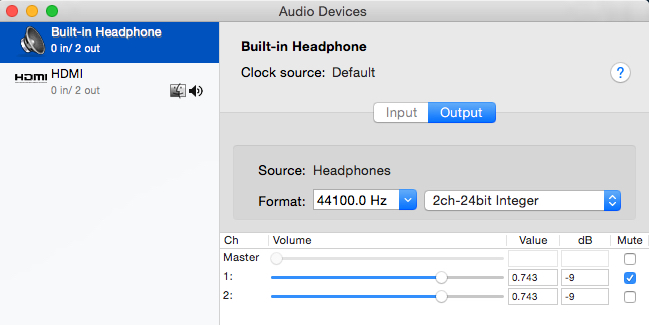
Finally, go to 'Applications/Utilities' and start the 'Audio MIDI Setup' program. On the left hand side of the window that appears you will see an option for 'Built-In Headphone'. In the main window you will see 3 channel sliders that are labelled 'Master', '1' and '2'.
Tick the 'Mute' box to the right of the Channel 1 slider. Once completed it should look like this :
You can now quit the Audio MIDI Setup.
The final step now is to install and run the 'DPCI Manager' program, which is located in your Downloads folder. When you run this program, select the icon at the top centre of the screen labelled 'Rebuild Caches', and enter your password when requested.
This will take a few minutes and will rebuild the system caches, taking into account the new files and patches you have applied.
Keep a watch on the 'Log' window that appears in DPCI Manager. This will show you the progress of rebuilding the caches and may take a few minutes to complete.
When it has finished you will see the following at the top of the Log window :
At this point you can close the DPCI Manager program and then reboot your NUC.
You can verify the correct installation and setup of the audio options by checking the following details :
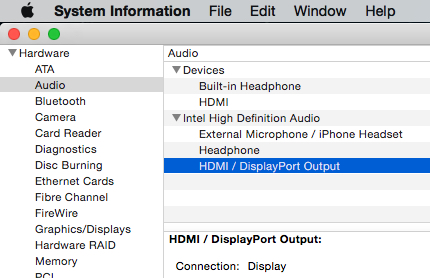
System Information > Audio Options (The 'HDMI/DisplayPort Output' is shown)
System Preferences > Sound > Sound Effects (The output devices are correctly listed)
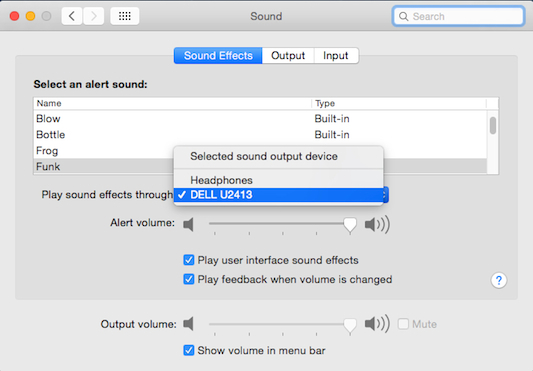
System Preferences > Sound > Output (The correct devices are available to output sound)
Remember, with HDMI audio devices, there will be no volume control slider shown here. This is normal.
Summary : We now have full ALC283 and HDMI/DisplayPort audio configured and working.
Section 10 - Customizing The System
This section is completely optional and does not affect the functionality of the NUC, but it is something I like to do as a nice finishing touch!
Here we will customise several items which include :
About This Mac > Overview > Title (Mac model)
About This Mac > Overview > Memory (Type/Name/Size)
About This Mac > System Report > Hardware Overview > SMC Version
Before we begin this part, install and run the 'Text Wrangler' program from your Downloads folder.
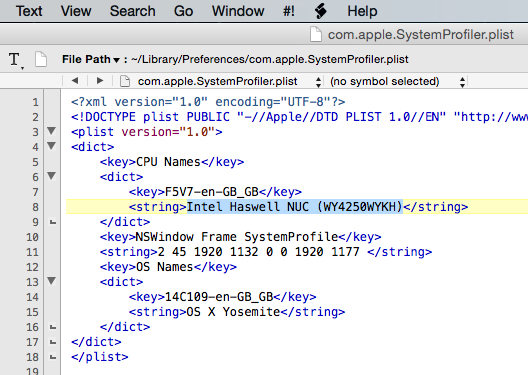
About This Mac > Overview > Title (Mac model)
Open this file :
'Yosemite/Users/YourUserName/Library/Preferences/com.apple.SystemProfiler.plist'
Change the line as highlighted in the picture below with the description of your choosing :
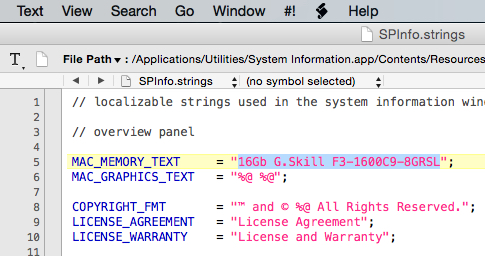
About This Mac > Overview > Memory (Type/Name/Size)
Open this file :
'Applications/Utilities/System Information.app/Contents/Resources/YourLanguage.lproj/SPInfo.strings'
Change the line as highlighted in the picture below with your memory specification :
Now save both files; you may be asked for your password by Text Wrangler.
Now when we look at 'About This Mac' we can see the customization :
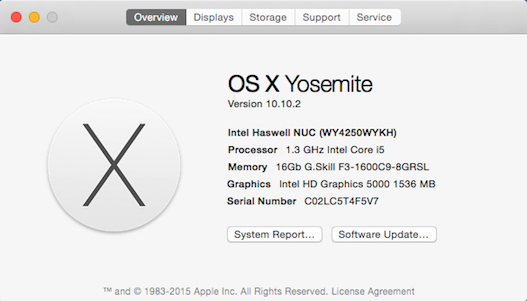
Note : I have not yet figured out how to change the processor or graphics description, or how to change the 'X' icon shown above. If anyone knows, please post and I will add the information to this guide.
About This Mac > System Report > Hardware Overview > SMC Version
Here we will make a small change to the FakeSMC.kext to make it report the correct SMC version for our System Definition (MacbookAir6,2) and also SMC type.
First of all, you need to update to the latest version of the FakeSMC file. It is initially installed as part of Multibeast, but the developers update FakeSMC and its associated plugins quite regular.
To update FakeSMC and the plugins, first open the 'HWMonitor' program in your 'Applications' folder. This will display as a small icon in the top right hand side of the main OSX screen. Left click on this icon, and in the popup display that appears, click on the 'gearwheel' icon in the top right, as shown below :
This will show a small context menu with an option to 'Check For Updates...'. Select the updates option; the program will then do a check (You must have a working internet connection for this to work). Take the option to run the update where the latest version will then be downloaded to your computer and it will automatically run the installer.
This is a standard OSX style installer and you should click through the initial screens until you get to the 'Installation Type' section; on this part make sure you click on the 'Customize' option and select ALL options and plugins, as shown below :
Allow the install to complete and then reboot your NUC.
Next, using OSX Finder, copy the file FakeSMC.kext from '/System/Library/Extensions' to your OSX Desktop.
Right click on this file and select 'Show Package Contents'. Open the 'Contents' folder, and copy the file Info.plist to your desktop.
In your Downloads folder, unzip and install the 'PlistEditPro' program. Open PlistEdit Pro and open the Info.plist file on your desktop.
In the top window of PlistEdit Pro, using the navigation triangles, navigate to the following location :
'IOKitPersonalities/FakeSMC/Configuration'
In the list you will see a string entry for 'smc-compatible' with a value of 'smc-napa'. Double click on the text that says smc-napa so it becomes editable, and change it from 'smc-napa' to 'smc-huronriver'. It should look like this when done :
Next, navigate to :
'IOKitPersonalities/FakeSMC/Configuration/Keys/REV'
Item 1 under the 'REV' subkey is where we make the next change. It currently holds the default SMC version of 1.30f3. We want to change this to the correct version for the MacbookAir6,2, which is version 2.13f9.
To do this, double click on the data value of Item 1 and change it from :
01300F00 0003
To this new value :
02130F00 0009
Now drop down one key level from 'REV' to 'RVBF' and repeat the process.
Finally drop down one level again from 'RVBF' to 'RVUF' and repeat the process again.
At the end, it should look like this :
What we have done is set the correct SMC type, and changed 3 instances of the SMC version to the correct version number.
Save the file and close PlistEdit Pro.
Right click on the Info.plist file on the desktop and select 'Copy Info.plist'.
Now, right click on 'FakeSMC.kext' on the desktop and once again select 'Show Package Contents'.
Navigate into the 'Contents' folder and then paste the updated 'Info.plist' by right clicking and selecting 'Paste Item'. Replace the existing one when prompted.
What we have now done is to extract the 'Info.plist' file from 'FakeSMC.kext', made some changes and put the updated file back. All we need to do now is install the updated 'FakeSMC.kext' on our system and reboot.
Open the DPCIManager program, click on the 'Install Kext' icon at the top center of the screen, and select the 'FakeSMC.kext' file on the desktop. You will be asked if you want to overwrite the existing one, to which you should click on 'Ok', and after entering your password, the newly updated 'FakeSMC.kext' will be installed.
Again, you should wait for the kext to finish installing, by waiting for the text to appear at the top of the Log window. Here is a reminder of what you are looking for :
Now close 'DPCIManager' and reboot your NUC. Take a look in System Information. The value for 'SMC Version' should now show the correct value of 2.13f9 as seen highlighted here :
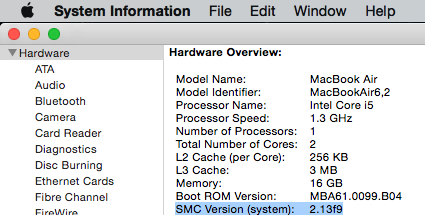
Something to consider is that 'FakeSMC' is updated often; each time you run the update option, the correctly edited 'FakeSMC' will be overwritten, so you will need to go back and repeat the edit for the SMC Version as described above.
You can also download the latest version of the 'FakeSMC' and plugins manually by checking here. The package name is called 'HWSensors'.
Summary : The NUC now has a few extra tweaks to make it look more mac-like. Phew!! You have now reached the end of the guide.
If Something Is Not Working As Expected
As with the previous guide, if you have any issues with something not working as expected, please make a post detailing what you think is wrong and why. Screenshots help with this too.
And above all, when posting requests for help, state clearly the make, model and capacity you are using for the following hardware:
Ram Memory
SSD / Hard Drive
Wifi/Bluetooth card or devices
Make & Model of display
Display connection type i.e HDMI or DisplayPort
Whether you are using an adaptor cable or not
If it is a boot related error, a clear and legible screenshot
I will not respond to requests for help without this information provided.
Known Issues
HWmonitor generates a warning in the system log about being unable to parse the maximum RPM for Fan1 and Fan2. This is an issue with HWmonitor itself and not with your NUC.
Credits :
ReHabMan for his kernel patching code
PikeRAlpha for his kernel patching code
Pjalm for his USB power fix
Macman for providing Chimera, Multibeast & Unibeast
Toleda for his help with HDMI audio & SSDT
Minihack for his help providing the audio kext file
TonyMac team for the website and install tools
All the developers of the HWSensors package
Resident mod Stork for his guidance and assistance
ChangeLog
02 Mar 2015 - Initial release
07 Mar 2015 - Updated error reporting guidance
22 Mar 2015 - Update post #2 for upgrading to 2015-002 & 2015-003
09 Apr 2015 - Update post #2 with initial information for OSX 10.10.3
10 Apr 2015 - Update post #2 with update guide for OSX 10.10.3
Introduction
First of all, welcome to the new Yosemite install guide for the Intel Haswell NUC !
This guide follows on from the previous Mavericks version (here) and has now been updated for Yosemite 10.10.2. This version of the guide has been delayed since my NUC decided to die on me just before xmas, it has taken until now to get the replacement unit. This does not mean they are unstable or unfit for purpose; I was simply unlucky that it crapped out on me at that time.
As part of this update, I have worked on the latest bios version and software versions, all of which are detailed in the guide.
The current hardware reads like this :
Intel Haswell NUC Model D54250WYKH
Amazon : http://www.amazon.com/dp/B00IEDGMRK
16Gb G.Skill Ripjaws DDR3 Ram (F3-1600C9D-16GRSL)
Amazon : http://www.amazon.com/dp/B00EOTYZOA
Samsung 840 EVO 1Tb mSata SSD (MZ-MTE1T0BW)
Amazon : http://www.amazon.com/dp/B00HWHVNUU
Amazon : http://www.amazon.com/dp/B00IEDGMRK
16Gb G.Skill Ripjaws DDR3 Ram (F3-1600C9D-16GRSL)
Amazon : http://www.amazon.com/dp/B00EOTYZOA
Samsung 840 EVO 1Tb mSata SSD (MZ-MTE1T0BW)
Amazon : http://www.amazon.com/dp/B00HWHVNUU
As before, the guide is only verified to work with the versions stated; that is version 0035 for the bios and 10.10.2 OSX. Previous bios versions and previous versions of OSX have worked well together, but I do not have the time to test and verify every OSX version with every bios version ever released.
As previously, I recommend you do your homework; read this guide from start to finish before commencing the install, and pay particular attention to Section 1 of the guide. We will be using the standard TonyMacX86 tools to achieve this (Chimera/Multibeast/Unibeast). There is an alternative install method using Clover, which is detailed here and Minihacks build here; you are free to choose either method of course, but please do not attempt to mix and match these methods; it just wont work.
On with the guide then !
Guide Layout
The guide is broken down into 8 simple sections; you are recommended to read and complete them all in the order stated. They are :
1. Pre-Install Notes
2. Hardware Covered By The Guide
3. What Works And What Doesn’t Work
4. Download The Software
5. Setup The Bios
6. Create The Unibeast Installer
7. Install OSX
8. Configure Multibeast
9. Audio Setup And Configuration
10. Customizing The System
Section 1 - Pre-Install Notes
!!! IMPORTANT !!!
Take your time and pay attention to the guide; follow it to the letter. Copy the files to the exact locations specified. Run the programs from the locations specified. This is important to help ensure a successful install.
Creating The Unibeast Installer
Newer versions of Unibeast, including the one we use here, do not by default allow you to use an external USB drive. Installing from an external USB drive provides a smoother and faster experience overall. If you wish to use an external USB drive, then you should first erase and then partition it using the Disk Utility tool in OSX. Create a single partition of 8 Gb in size at the start of the drive, then create a second blank partition that uses all remaining space. This should allow to you use the drive in Unibeast, making sure you use that first partition to install to.
Ram Memory
If you only have a single stick of ram memory in your NUC, then do yourself a big favour; go to your favourite hardware site and get yourself a second stick of ram that is exactly the same as your existing one, or, treat yourself and order a brand new ram kit with 2 x sticks in it. Really.
The NUC is designed to operate in dual channel mode, which means for optimum operation, you really do need 2 x ram sticks. Just about every mac ever made uses dual channel memory. And just about every version of OSX ever produced assumes the machine will be running in dual channel mode too.
If you insist on using a single stick of ram memory, this guide *might* work if you are very lucky, but chances are it will fail at some point. I will be unable to help you get your system installed if you only have one memory stick.
Also, consider the fact that the HD5000 uses system memory for the graphics display, you shouldn't skimp when it comes to ram memory. 16Gb is ideal, 8Gb is ok. I would not recommend running the NUC long term with just 4Gb, as this wont leave a lot of memory for OSX.
The link at the top of this guide will take you to the memory I recommend. This has worked flawlessly for me every time, and is of excellent quality!
Rebooting The NUC During The Install
At several stages throughout this guide you will need to reboot your NUC. My advice when this is required, is to shut down the NUC, remove the power connector for 20 seconds, then plug it back in and start it up again. This means it will take a fraction longer to complete the install, but I have found from experience that this really helps to minimise the installer crashes that can happen.
Installing To An SSD Drive
If you are installing OSX to an SSD drive in your NUC, I recommend starting with a blank unformatted drive. Most manufacturers provide tools that will allow you to flash erase the SSD and reset it back to almost factory condition.
Old school disk formatting tools that write 0/1 to every block on the drive are not recommended; they do erase the drive but do it in a very unfriendly way. My personal choice for flash erasing my SSD's is a tool called PartedMagic.
Section 2 - Hardware Covered By The Guide
There are several variations of the Core i5 model NUC; they are all supported by this guide :
Intel Haswell NUC D54250WYB : Motherboard Only Package
Intel Haswell NUC D54250WYK : Motherboard In Standard Chassis
Intel Haswell NUC D54250WYKH : Motherboard In Enhanced Chassis, Space For 2.5” SSD
Note : The motherboard in each of the 3 packages contains the same hardware.
Section 3 - What Works And What Doesn't Work
Built-In Hardware :
Working : Audio (Realtek ALC283)
Working : Ethernet (Intel I218-V)
Working : Graphics (Intel HD5000)
Working : USB3 (Intel)
Optional Hardware :
Working : Apple Cinema Display 27" (DP Version)
Working : Broadcom BCM4322 (Airport Extreme)
Working : Dell U2311H (1920x1080 Ultrasharp Monitor)
Working : Dell U2413 (1920x1200 Ultrasharp Monitor)
Working : G.Skill Ripjaws Ram Memory (F3-1600C9D-16GSRL)
Working : Intel SSDMCEAC240B3 mSata SSD (240 Gb)
Working : Samsung EVO 840 mSata SSD (1 Tb)
Additional Functionality :
Working : Audio Over DisplayPort
Working : Audio Over HDMI
Working : GPU Power Management
Working : Power Management (P-States upto 2.6Ghz)
Working : Sleep & Shutdown
Note : The built-in microphone doesn't work.
Note : Other wireless LAN/bluetooth cards may work but have not been tested at this time.
Note : CIR (Consumer Infra-Red) on the NUC is NOT working at this time.
Note : P-states have been tested and showed the following : 8, 13, 14, 16, 17, 18, 19, 22, 23, 26
Summary : The working state of the hardware looks good with the minor exceptions of the CIR device and built-in microphone, which are not likely to ever have support.
Section 4 - Download The Software
Follow the links below to download the programs and patches we will use for the install. Download them all before you begin :
| Chimera (4.0.1) Bootloader Install Program Credit : MacMan [Link] | DPCIManager (1.5) PCI Hardware Viewer & Utility Credit : phpdev32 (Sourceforge) [Link] |
| Mac OSX (10.10.2) Main OSX Install Package Credit : Apple Inc. [Link] | Multibeast (7.2.0) Post Install Utility Credit : tonymacx86 LLC [Link] |
| PlistEdit Pro (1.8.1) Plist File Editor Credit : FatCat Software [Link] | TextWrangler (4.5.12) Free Text Editor Credit : Bare Bones Software Inc [Link] |
| Unibeast (5.1.0) Tool To Create The USB Installer Credit : tonymacx86 LLC [Link] | NUC Install Pack (6.0)
Supporting Files For The Install
Credit : Take a guess ") Link : View attachment NUC Install Pack V6.0.zip
Link : View attachment NUC Install Pack V6.0.zip |
| Azul Framebuffer Patch (2.1) DP / HDMI Audio Enabler Credit : Toleda [Link] (View Raw/Save File) | SSDT-1 (2.0) Additional SSDT Configuration File Credit : Toleda [Link] (View Raw/Save File) |
Note : Download size for all the tools (Except OSX 10.10.2) is around 80 megabytes.
Note : Azul Framebufer Patch filename : [graphics_intel_hd5k-azul-f-90_patch.command.zip]
Note : SSDT-1 filename : [NUC-HD4600-A1.zip]
Note : Some site registrations may be required.
Note : Other software versions *may* work but are not supported by this guide.
Summary : Download the specified versions of the software we use, using the links provided.
Section 5 - Setup The Bios
The bios version string should be WYLPT10H.86A.0035.2015.0126.1814, which is version 0035 on the Intel download site.
Below is an example of how it looks in the bios itself :
Follow the bios screenshots included in the NUC Install Pack to set your bios settings correctly. Pay particular attention to the following :
a. Security > Intel(R) VT for Directed I/O (VT-d).
It is recommended to de-select this for OSX to work correctly. There is a workaround where you can have it enabled, but VT-d has no real use in OSX anyway :
b. Boot > Boot Priority.
At this time, you should enable both 'UEFI Boot' and 'Legacy Boot' :
The observant ones of you will notice above that I have the Intel mSata SSD installed; this is what I use for testing and installation checks, before switching to the Samsung 840 SSD.
c. Devices > Video.
Set the ‘IGD Primary Video Port’ according to the type of display connection you are using. I have set the secondary port to 'None' and the 'IGD Minimum Memory' to 1Gb. This memory setting does not appear to have any effect on the actual amount of memory used by OSX :
Note : The NUC Install Pack includes screenshots of the exact bios settings I have used; you should use these too. All of these have been updated from version 0035 of the bios.
Summary : Make sure you setup the bios correctly before you begin, otherwise it might not work.
Section 6 - Create The Unibeast Installer
To create the Unibeast Installer we will use the official Unibeast guide and then customize it to work with the NUC. You will need a blank USB memory key for this; it should be at least 8Gb capacity. Some USB hard drives may also be used for this; see the notes in Section 1 for details.
First, head over to the official Unibeast creation guide which can be found here. Follow Steps 1 & 2 of that guide to download OSX Yosemite (If you haven't done so already), and then create your Unibeast Installer.
Be sure to label the chosen memory key as 'USB', as directed in that guide.
Once those 2 steps are complete, we then need to customize the installer to make it work with our NUC.
Start by opening the 'Terminal' app and at the prompt, type in the following and press Enter :
Code:
[COLOR=#FF0000]sudo -s[/COLOR]You will be prompted for your password; go ahead and type in your password then press Enter.
Next, type in the following at the prompt and press Enter:
Code:
[COLOR=#FF0000]chflags -R nohidden /Volumes/USB/*[/COLOR]This has made all of the files and folders visible on the Unibeast installer, which were hidden when it was created. You can now exit the 'Terminal' app.
Next, unzip the NUC Install Pack; we are interested in 3 files which are :
- kernel
- smbios.plist
- org.chameleon.boot.plist
File : 'kernel'
From : The NUC Install Pack
To : '/System/Library/Kernels/' (On the Unibeast Installer)
File : 'smbios.plist'
From : The NUC Install Pack
To : '/Extra' (On the Unibeast Installer)
File : 'org.chameleon.boot.plist'
From : The NUC Install Pack
To : '/Extra' (On the Unibeast Installer)
Next, go to the '/Extra/modules' folder on the Unibeast Installer and delete the file called 'HDAEnabler.dylib'.
At the root of your Unibeast Installer drive, create a folder called 'Software', and copy all the software you downloaded into this folder, including the NUC Install Pack. Do not copy the OSX Installer app itself, just the other software. This will save you having to swap drives around later.
Summary : We have created a standard Unibeast Installer, with customized kernel and configuration files, as well as the necessary software we will need during installation.
Section 7 - Install OSX
We are now ready to commence the installation of OSX to the NUC. Insert your Unibeast Installer drive to a free USB port on the NUC and reboot it. When it boots, press F10 to get to the boot menu and select the Unibeast Installer drive to boot from.
Now you will see the Chimera boot screen with the 'USB' icon in the middle. Hit the space bar, type in the following boot flags and then press Enter:
Code:
[COLOR=#FF0000]-v UseKernelCache=No GraphicsEnabler=No IGPEnabler=Yes IGPlatformID=0D220003 maxmem=4096 PCIRootUID=0[/COLOR]The configuration file on the Unibeast Installer is preset for 1080p screen resolution. If you use a monitor that has a resolution of anything other than this (1920 x 1080), you may need to add this additional boot flag :
Code:
[COLOR=#FF0000]"Graphics Mode"="2560x1440x32"[/COLOR]The example above is for a 1440p screen, such as the 27 inch Apple Cinema Display, which has a resolution of 2560 x 1440 pixels. Adding this boot flag will override the default one on the Unibeast Installer, but make sure you use the quotes as shown above.
The reason for this is because sometimes the graphic display on the installer screen can otherwise appear corrupted and unusable. You should add this additional boot flag throughout the installation steps; once your NUC is booting on its own, you can add the correct resolution settings permanently to your 'org.chameleon.boot.plist' file.
After a minute or so of loading files, you will see the usual OSX installer screen.
First thing to do is load the 'Disk Utility' app from the menu at the top of the screen, and partition your drive accordingly. I used the entire capacity of the drive and labelled it 'Yosemite'. The rest of the guide assumes you have used the same label; you are free to rename it after the installation is complete. When creating the partition, be sure to click on the 'Options' button and set the partition scheme to 'GUID Partition Table'. This should be the default option but always best to check.
When you are done partitioning, start the installation and let the OSX Installer do its magic.
At the end of the install when prompted you should reboot your NUC, but leave the Unibeast Installer connected. Once again, when the NUC boots, press F10 to get to the boot menu and select the Unibeast Installer drive to boot from.
This time you will see the Chimera boot screen with a 'USB' icon and also a 'Yosemite' icon.
Highlight the 'USB' icon, hit the space bar and type in the same boot flags followed by the Enter key :
Code:
[COLOR=#FF0000]-v UseKernelCache=No GraphicsEnabler=No IGPEnabler=Yes IGPlatformID=0D220003 maxmem=4096 PCIRootUID=0[/COLOR]Remember to add your custom Graphics Mode flag if needed.
This will start the OSX Installer a second time; when you reach the installer screen, start the 'Terminal' app from the 'Utilities' menu at the top. You should see the bash prompt like this :
Code:
bash-3.2#Copy the modified kernel file FROM the Unibeast Installer TO the NUC system drive (Yosemite). To do that type in the following and press Enter :
Code:
bash-3.2# [COLOR=#FF0000]cp -v '/Volumes/[B]USB[/B]/System/Library/Kernels/kernel' '/Volumes/[B]Yosemite[/B]/System/Library/Kernels/[/COLOR]'Now exit the 'Terminal' app.
Summary : We now have OSX fully installed to the NUC system drive (Yosemite) and the modified kernel in place that will allow it to boot correctly.
Section 8 - Configure Multibeast
The time has now come to setup Multibeast on your NUC. Quit the OSX Installer and reboot your NUC but leave the Unibeast Installer plugged in. Press F10 to get the boot selection screen and select the Unibeast Installer drive to boot from.
This time at the Chimera boot screen, highlight the 'Yosemite' icon. Hit the space bar and use the same boot flags as before, or the ones you wrote down :
Code:
[COLOR=#FF0000]-v UseKernelCache=No GraphicsEnabler=No IGPEnabler=Yes IGPlatformID=0D220003 maxmem=4096 PCIRootUID=0[/COLOR]After a minute or so of scrolling files up the screen, the NUC should now boot into the OSX installation. You will be presented with the usual configuration steps where you complete the network selection, license agreement and create a new User Account. Complete these steps as normal and you will reach the OSX desktop screen.
Before we go any further, copy all of the software FROM the 'Software' folder you created on the Unibeast Installer drive TO the Downloads folder of your NUC. Unzip the NUC Install Pack in the Downloads folder.
Now, from the Downloads folder of your NUC, unzip and start Multibeast and load the NUC.mb configuration file from the NUC Install Pack. This will pre-select all the files and options we are interested in, and should look like this :
The '10.10.x TRIM Patch' is optional but recommended if you are installing to an SSD drive, unless of course you have your own trim method, such as the Cindori TrimEnabler.
The theme can be changed to whichever one you prefer.
Whatever you do though, please do NOT select the QuickStart option in Multibeast or change any other settings, as this will cause issues. The default selection in the 'NUC.mb' configuration file as shown above should be suitable for most users.
Make sure you select your NUC system drive (Yosemite) as the install target before proceeding.
Close Multibeast when it has finished installing.
On the NUC system drive (Yosemite), go to the '/Extra/modules' folder. Delete the file called 'HDAEnabler.dylib'.
Next, we need to copy those 3 files to the NUC system drive (Yosemite) :
File : 'SSDT.aml'
From : The NUC Install Pack
To : '/Extra' (On the Yosemite System Drive)
File : 'smbios.plist'
From : The NUC Install Pack
To : '/Extra' (On the Yosemite System Drive)
File : 'org.chameleon.boot.plist'
From : The NUC Install Pack
To : '/Extra' (On the Yosemite System Drive)
You can now eject the Unibeast Installer and reboot the NUC.
When you reboot it, type in the following flags at the boot screen (This only needs to be done once) and press the Enter key :
Code:
[COLOR=#FF0000]-v UseKernelCache=No[/COLOR]Your NUC should now boot on its own.
Do a quick check to make sure the graphics are working as expected; go to About This Mac > More Info > System Report then select the 'Graphics/Displays' section. If all is well it should look similar to this :
Now close System Information.
Summary : We now have a basic configuration installed and made the NUC bootable.
Section 9 - Audio Setup And Configuration
As part of the Multibeast installation, we have already installed the kext file that is needed for the ALC283 internal audio, but there are a couple more steps to complete which will also enable audio over HDMI/Displayport, and complete our configuration.
Unzip the file called 'NUC-HD4600-A1.zip' in your Downloads folder. In the resulting folder you will find a file called 'SSDT-1.aml'; you should copy this to the /Extra folder of your NUC system drive (Yosemite).
Next we will apply the Azul Framebuffer patch. This is located in your Downloads folder and is called :
'graphics_intel_hd5k-azul-f-90_patch.command.zip'
Double click the file to unzip it, and then double click the unpacked file to apply the actual patch. This patch will run in a Terminal window and you will be asked for your password before proceeding. Once the patch has applied, check the output for any error messages.
Finally, go to 'Applications/Utilities' and start the 'Audio MIDI Setup' program. On the left hand side of the window that appears you will see an option for 'Built-In Headphone'. In the main window you will see 3 channel sliders that are labelled 'Master', '1' and '2'.
Tick the 'Mute' box to the right of the Channel 1 slider. Once completed it should look like this :
You can now quit the Audio MIDI Setup.
The final step now is to install and run the 'DPCI Manager' program, which is located in your Downloads folder. When you run this program, select the icon at the top centre of the screen labelled 'Rebuild Caches', and enter your password when requested.
This will take a few minutes and will rebuild the system caches, taking into account the new files and patches you have applied.
Keep a watch on the 'Log' window that appears in DPCI Manager. This will show you the progress of rebuilding the caches and may take a few minutes to complete.
When it has finished you will see the following at the top of the Log window :
Code:
/: no supported helper partitions to update
Lock acquired; proceeding.
/: no supported helper partitions to update
Created prelinked kernel /System/Library/Caches/com.apple.kext.caches/Startup/kernelcache.
At this point you can close the DPCI Manager program and then reboot your NUC.
You can verify the correct installation and setup of the audio options by checking the following details :
System Information > Audio Options (The 'HDMI/DisplayPort Output' is shown)
System Preferences > Sound > Sound Effects (The output devices are correctly listed)
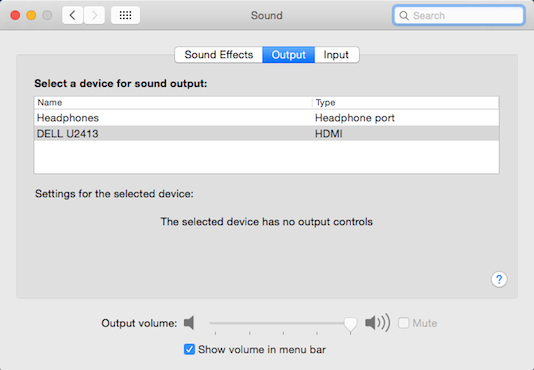
System Preferences > Sound > Output (The correct devices are available to output sound)
Remember, with HDMI audio devices, there will be no volume control slider shown here. This is normal.
Summary : We now have full ALC283 and HDMI/DisplayPort audio configured and working.
Section 10 - Customizing The System
This section is completely optional and does not affect the functionality of the NUC, but it is something I like to do as a nice finishing touch!
Here we will customise several items which include :
About This Mac > Overview > Title (Mac model)
About This Mac > Overview > Memory (Type/Name/Size)
About This Mac > System Report > Hardware Overview > SMC Version
Before we begin this part, install and run the 'Text Wrangler' program from your Downloads folder.
About This Mac > Overview > Title (Mac model)
Open this file :
'Yosemite/Users/YourUserName/Library/Preferences/com.apple.SystemProfiler.plist'
Change the line as highlighted in the picture below with the description of your choosing :
About This Mac > Overview > Memory (Type/Name/Size)
Open this file :
'Applications/Utilities/System Information.app/Contents/Resources/YourLanguage.lproj/SPInfo.strings'
Change the line as highlighted in the picture below with your memory specification :
Now save both files; you may be asked for your password by Text Wrangler.
Now when we look at 'About This Mac' we can see the customization :
Note : I have not yet figured out how to change the processor or graphics description, or how to change the 'X' icon shown above. If anyone knows, please post and I will add the information to this guide.
About This Mac > System Report > Hardware Overview > SMC Version
Here we will make a small change to the FakeSMC.kext to make it report the correct SMC version for our System Definition (MacbookAir6,2) and also SMC type.
First of all, you need to update to the latest version of the FakeSMC file. It is initially installed as part of Multibeast, but the developers update FakeSMC and its associated plugins quite regular.
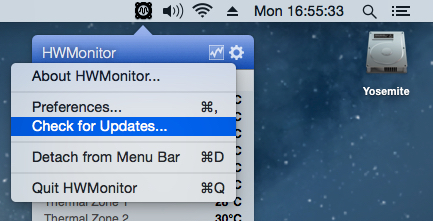
To update FakeSMC and the plugins, first open the 'HWMonitor' program in your 'Applications' folder. This will display as a small icon in the top right hand side of the main OSX screen. Left click on this icon, and in the popup display that appears, click on the 'gearwheel' icon in the top right, as shown below :
This will show a small context menu with an option to 'Check For Updates...'. Select the updates option; the program will then do a check (You must have a working internet connection for this to work). Take the option to run the update where the latest version will then be downloaded to your computer and it will automatically run the installer.
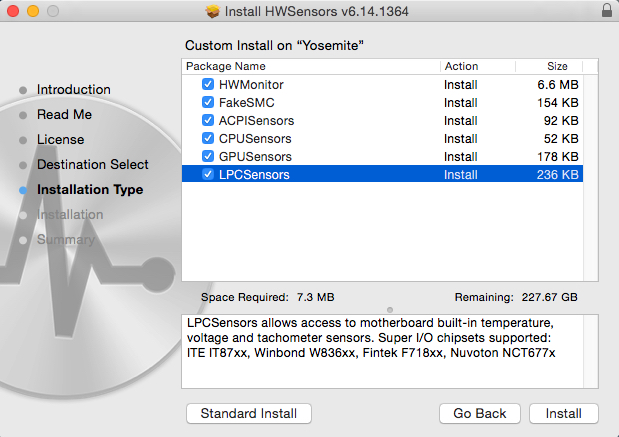
This is a standard OSX style installer and you should click through the initial screens until you get to the 'Installation Type' section; on this part make sure you click on the 'Customize' option and select ALL options and plugins, as shown below :
Allow the install to complete and then reboot your NUC.
Next, using OSX Finder, copy the file FakeSMC.kext from '/System/Library/Extensions' to your OSX Desktop.
Right click on this file and select 'Show Package Contents'. Open the 'Contents' folder, and copy the file Info.plist to your desktop.
In your Downloads folder, unzip and install the 'PlistEditPro' program. Open PlistEdit Pro and open the Info.plist file on your desktop.
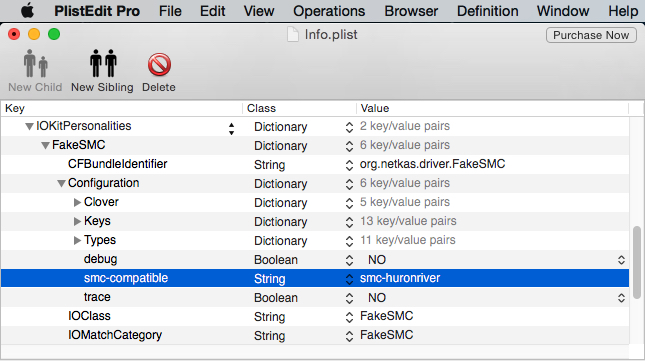
In the top window of PlistEdit Pro, using the navigation triangles, navigate to the following location :
'IOKitPersonalities/FakeSMC/Configuration'
In the list you will see a string entry for 'smc-compatible' with a value of 'smc-napa'. Double click on the text that says smc-napa so it becomes editable, and change it from 'smc-napa' to 'smc-huronriver'. It should look like this when done :
Next, navigate to :
'IOKitPersonalities/FakeSMC/Configuration/Keys/REV'
Item 1 under the 'REV' subkey is where we make the next change. It currently holds the default SMC version of 1.30f3. We want to change this to the correct version for the MacbookAir6,2, which is version 2.13f9.
To do this, double click on the data value of Item 1 and change it from :
01300F00 0003
To this new value :
02130F00 0009
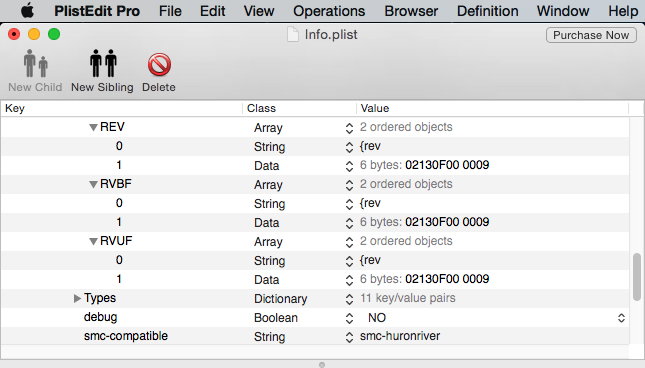
Now drop down one key level from 'REV' to 'RVBF' and repeat the process.
Finally drop down one level again from 'RVBF' to 'RVUF' and repeat the process again.
At the end, it should look like this :
What we have done is set the correct SMC type, and changed 3 instances of the SMC version to the correct version number.
Save the file and close PlistEdit Pro.
Right click on the Info.plist file on the desktop and select 'Copy Info.plist'.
Now, right click on 'FakeSMC.kext' on the desktop and once again select 'Show Package Contents'.
Navigate into the 'Contents' folder and then paste the updated 'Info.plist' by right clicking and selecting 'Paste Item'. Replace the existing one when prompted.
What we have now done is to extract the 'Info.plist' file from 'FakeSMC.kext', made some changes and put the updated file back. All we need to do now is install the updated 'FakeSMC.kext' on our system and reboot.
Open the DPCIManager program, click on the 'Install Kext' icon at the top center of the screen, and select the 'FakeSMC.kext' file on the desktop. You will be asked if you want to overwrite the existing one, to which you should click on 'Ok', and after entering your password, the newly updated 'FakeSMC.kext' will be installed.
Again, you should wait for the kext to finish installing, by waiting for the text to appear at the top of the Log window. Here is a reminder of what you are looking for :
Code:
/: no supported helper partitions to update
Lock acquired; proceeding.
/: no supported helper partitions to update
Created prelinked kernel /System/Library/Caches/com.apple.kext.caches/Startup/kernelcache.Something to consider is that 'FakeSMC' is updated often; each time you run the update option, the correctly edited 'FakeSMC' will be overwritten, so you will need to go back and repeat the edit for the SMC Version as described above.
You can also download the latest version of the 'FakeSMC' and plugins manually by checking here. The package name is called 'HWSensors'.
Summary : The NUC now has a few extra tweaks to make it look more mac-like. Phew!! You have now reached the end of the guide.
If Something Is Not Working As Expected
As with the previous guide, if you have any issues with something not working as expected, please make a post detailing what you think is wrong and why. Screenshots help with this too.
And above all, when posting requests for help, state clearly the make, model and capacity you are using for the following hardware:
Ram Memory
SSD / Hard Drive
Wifi/Bluetooth card or devices
Make & Model of display
Display connection type i.e HDMI or DisplayPort
Whether you are using an adaptor cable or not
If it is a boot related error, a clear and legible screenshot
I will not respond to requests for help without this information provided.
Known Issues
HWmonitor generates a warning in the system log about being unable to parse the maximum RPM for Fan1 and Fan2. This is an issue with HWmonitor itself and not with your NUC.
Credits :
ReHabMan for his kernel patching code
PikeRAlpha for his kernel patching code
Pjalm for his USB power fix
Macman for providing Chimera, Multibeast & Unibeast
Toleda for his help with HDMI audio & SSDT
Minihack for his help providing the audio kext file
TonyMac team for the website and install tools
All the developers of the HWSensors package
Resident mod Stork for his guidance and assistance
ChangeLog
02 Mar 2015 - Initial release
07 Mar 2015 - Updated error reporting guidance
22 Mar 2015 - Update post #2 for upgrading to 2015-002 & 2015-003
09 Apr 2015 - Update post #2 with initial information for OSX 10.10.3
10 Apr 2015 - Update post #2 with update guide for OSX 10.10.3
Last edited by a moderator:
