- Joined
- Mar 11, 2012
- Messages
- 26
- Motherboard
- Hackintosh
- CPU
- i7 2600K
- Graphics
- Nvidia 470
- Mac
- Classic Mac
- Mobile Phone
Ok, so I plan to try to do a work log here, however, I never have time to do anything like this, but I will try because I am so exited about this build.
First and foremost, i had everything I thought, but my newly bought G5 case where damaged in shipping so, now I have to wait another week or so for an replacement.. fingers itching... arghhh
Ok, short uppdate, Just won two auctions for Faulty G5's on Ebay.. Opps
well at least I will have materials to work with...
Ill post some images of the setup that I have at this moment as soon as I can get everything out on the floor for photography (as soon as my daughter sleeps in other words) but here it is in text.
Gigabyte GA z68X-UD3 gigabyte
Intel I7 - 2600k unlocked
16Gb corsair Ram
Antec Khuler 620 Water cooling
120Gb SSD OZC
Nvidia GTX 470 graphics
Corsair 620w PSU
Fans - arctic cooling
Aluminium profiles
Machine screws m3.5 for attachment to the original standofs.
Lian-li motherboard tray -
Heatshrink
Wire sleaving
Countersunk m3 hex and torx bolts of different versions.
Countersunk aluminium washers - for that apple look.
And some more bits and bobs
Some updated photos, The top mount PSU assembly, and my try fitting of the backplate, decided to go with the Lian-li one just filling in those ugly holes on the side. Might go back and have one laser cut later, but this will do for now.
IMG_1236.JPG
Testing Out the Lian Li backplate.
IMG_1242.JPG
And again and decided those horrible cut out things on the side, what ever they are for, needed to go
IMG_1248.JPG
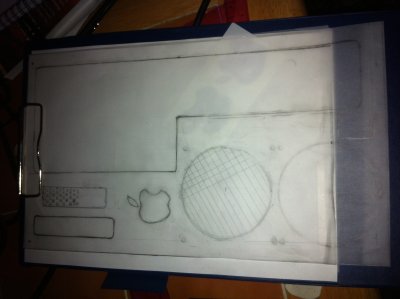
Here I masked of the area of the cut out in the Original Lian Li backplate, since I decided to go with that untill I can afford to get another one laser cut from Aluminium. I am planning on spray painting this backplate to match as closely as possible to the anodisation on the back of the G5.
IMG_1250.JPG
And here I have filled the area I masked before with good old J b Weld.
IMG_1257.JPG
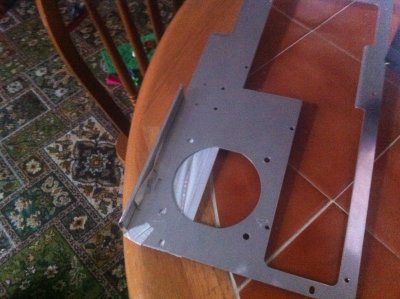
I then made a bracket to attach the PSU to the top shelf out of Aluminium angle bar.
IMG_1258.JPG
I have since this picture was taken corrected the cut out so it's square - except for the cable holes.
IMG_1282.JPG
test fitting the MB tray after my second drill to fit the original standoffs it happens, I measured wrongly, despite the measure twice rule")
IMG_1288.JPG
Here is the motherboard Tray together with the faux floor i made for cable management ant attachment of fans etc.
IMG_1290.JPG
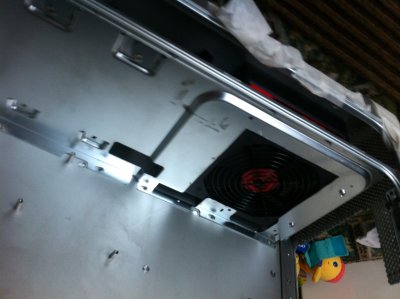
The Radiator/fan assembly before I cut it out in the front for better airflow, the fan fits snuggly inside i would probably not even have to screw it in if it was not for the water cooling Radiator.
I have taped two holes in the bottom and it scews into the original PSU holes at the bottom of the case, and attaches to the side to the faux floor with a Jb welded standoff.
IMG_1295.JPG
Radiator attachment before i brushed it.
Test fitting the bracket in the case.
First and foremost, i had everything I thought, but my newly bought G5 case where damaged in shipping so, now I have to wait another week or so for an replacement.. fingers itching... arghhh
Ok, short uppdate, Just won two auctions for Faulty G5's on Ebay.. Opps
well at least I will have materials to work with...
Ill post some images of the setup that I have at this moment as soon as I can get everything out on the floor for photography (as soon as my daughter sleeps in other words) but here it is in text.
Gigabyte GA z68X-UD3 gigabyte
Intel I7 - 2600k unlocked
16Gb corsair Ram
Antec Khuler 620 Water cooling
120Gb SSD OZC
Nvidia GTX 470 graphics
Corsair 620w PSU
Fans - arctic cooling
Aluminium profiles
Machine screws m3.5 for attachment to the original standofs.
Lian-li motherboard tray -
Heatshrink
Wire sleaving
Countersunk m3 hex and torx bolts of different versions.
Countersunk aluminium washers - for that apple look.
And some more bits and bobs
Some updated photos, The top mount PSU assembly, and my try fitting of the backplate, decided to go with the Lian-li one just filling in those ugly holes on the side. Might go back and have one laser cut later, but this will do for now.
IMG_1236.JPG
Testing Out the Lian Li backplate.
IMG_1242.JPG
And again and decided those horrible cut out things on the side, what ever they are for, needed to go
IMG_1248.JPG
Here I masked of the area of the cut out in the Original Lian Li backplate, since I decided to go with that untill I can afford to get another one laser cut from Aluminium. I am planning on spray painting this backplate to match as closely as possible to the anodisation on the back of the G5.
IMG_1250.JPG
And here I have filled the area I masked before with good old J b Weld.
IMG_1257.JPG
I then made a bracket to attach the PSU to the top shelf out of Aluminium angle bar.
IMG_1258.JPG
I have since this picture was taken corrected the cut out so it's square - except for the cable holes.
IMG_1282.JPG
test fitting the MB tray after my second drill to fit the original standoffs it happens, I measured wrongly, despite the measure twice rule
IMG_1288.JPG
Here is the motherboard Tray together with the faux floor i made for cable management ant attachment of fans etc.
IMG_1290.JPG
The Radiator/fan assembly before I cut it out in the front for better airflow, the fan fits snuggly inside i would probably not even have to screw it in if it was not for the water cooling Radiator.
I have taped two holes in the bottom and it scews into the original PSU holes at the bottom of the case, and attaches to the side to the faux floor with a Jb welded standoff.
IMG_1295.JPG
Radiator attachment before i brushed it.
Test fitting the bracket in the case.
Attachments
-
 IMG_1258.JPG1.4 MB · Views: 465
 -
 IMG_1257.JPG1.3 MB · Views: 490
 -
 IMG_1250.JPG2.3 MB · Views: 456
 -
 IMG_1248.JPG2.2 MB · Views: 469
 -
 IMG_1242.JPG1,018.7 KB · Views: 455
 -
 IMG_1236.JPG1.2 MB · Views: 491
 -
 IMG_1290.JPG1.5 MB · Views: 419
 -
 IMG_1288.JPG1.1 MB · Views: 389
 -
 IMG_1282.JPG1.4 MB · Views: 395
 -
 IMG_1295.JPG1.6 MB · Views: 340